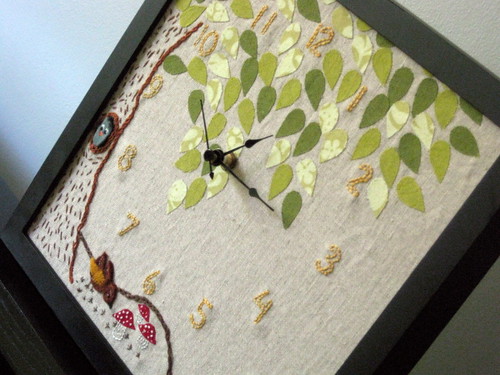
the Woodland Clock
It's. finally. done.

This was the project that never ends. Began early 2010 from Meg McElwee's book Sew Liberated, rescued early this year and finally, finally completed with help from husband and friends. Why so difficult? Creating the embroidery scene was a joy, but finishing it as a clock - not so much. In case some brave soul is interested in making a project like this, here are some things I wish I'd known.
* Start with buying a shadow box frame. If you want to hang your clock on the wall, you need a frame that stands away from the wall a good bit to allow the clock hardware enough room. A shadow box works perfectly (thanks, Brandon!). You mount the finished embroidery where the glass would normally sit at the front of the shadow box. Meg used a normal frame and simply propped her clock leaning against the wall for the book photoshoot.

* Design your embroidery with the shadow box dimensions in mind. I couldn't find a shadow box to fit Meg's 8 x 10 design. Thank goodness I had cut a large enough piece of linen background that I could fill in the scene to one side to accommodate this square frame. There could have been tears.

* Use a scrapbooking punch to create the hole for the clock hands. After finishing the embroidery, Meg instructs you to mount it on adhesive mounting board (great idea!) and then to buy a "long arm hole punch" for punching the hole at center. My craft store had one for $18. And it had a loooong arm, but it wouldn't work with the thickness of the embroidery board. A friend who is an avid scrapbooker had this fancy screw punch. Works like a dream!
*Be super careful not to bend the clock hands. The craft store only had brass clock hardware, so I spray painted my clock hands black as per Meg's suggestion. Unfortunately, I bent them slightly in the process. And though I've tried to bend them back to perfectly straight, they still aren't. Know how I can tell? My clock doesn't keep time. The hands occasionally get stuck on each other or rub slightly, messing with the clock mechanism. I know - that's completely sad.

So I may have a clock that doesn't quite work, but it's darn cute. I fully intend to fix it (ie, get my husband to fix it) or buy a new clock mechanism someday, but for now I'm more than ready to be "done."
It can be such a challenge to finish those things that don't want to finish!

This was the project that never ends. Began early 2010 from Meg McElwee's book Sew Liberated, rescued early this year and finally, finally completed with help from husband and friends. Why so difficult? Creating the embroidery scene was a joy, but finishing it as a clock - not so much. In case some brave soul is interested in making a project like this, here are some things I wish I'd known.
* Start with buying a shadow box frame. If you want to hang your clock on the wall, you need a frame that stands away from the wall a good bit to allow the clock hardware enough room. A shadow box works perfectly (thanks, Brandon!). You mount the finished embroidery where the glass would normally sit at the front of the shadow box. Meg used a normal frame and simply propped her clock leaning against the wall for the book photoshoot.

* Design your embroidery with the shadow box dimensions in mind. I couldn't find a shadow box to fit Meg's 8 x 10 design. Thank goodness I had cut a large enough piece of linen background that I could fill in the scene to one side to accommodate this square frame. There could have been tears.

* Use a scrapbooking punch to create the hole for the clock hands. After finishing the embroidery, Meg instructs you to mount it on adhesive mounting board (great idea!) and then to buy a "long arm hole punch" for punching the hole at center. My craft store had one for $18. And it had a loooong arm, but it wouldn't work with the thickness of the embroidery board. A friend who is an avid scrapbooker had this fancy screw punch. Works like a dream!
*Be super careful not to bend the clock hands. The craft store only had brass clock hardware, so I spray painted my clock hands black as per Meg's suggestion. Unfortunately, I bent them slightly in the process. And though I've tried to bend them back to perfectly straight, they still aren't. Know how I can tell? My clock doesn't keep time. The hands occasionally get stuck on each other or rub slightly, messing with the clock mechanism. I know - that's completely sad.

So I may have a clock that doesn't quite work, but it's darn cute. I fully intend to fix it (ie, get my husband to fix it) or buy a new clock mechanism someday, but for now I'm more than ready to be "done."
It can be such a challenge to finish those things that don't want to finish!