Triangles Quilt tutorial

Have you fallen in love with a quilt design for our Scrap Attack challenge? There are great ideas flying left and right at the Scrap Attack flickr group! I'm about halfway into piecing a triangles quilt a la Ungt Blod. Things were a little dicey at the beginning and more than a few scraps were murdered, but I worked my way through the mess until something took shape that felt right to me.
The key detail for me was
Now I'm sure you notice the solids, right? Right. So, I gave away the colorful scraps (many of which were prints on white - I seem to have something against prints on white) and pulled lots of solid scraps and tonal print scraps that read a single color such as "PINK" or "TURQUOISE" instead of "anything goes." My quilt is still made 100% from scrap, but it's selective scrapping. And that's allowed! (As are mini quilts in this quilt-along, if you didn't get the comment memo.)
So here we are today with a Triangle Tutorial! My quilt is still in process, but there's enough here to get you started
Step 1: Cut Triangles
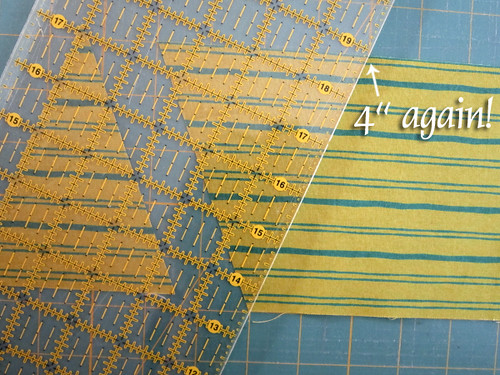
My triangles are 4" across at the base and 5" high, unfinished. You can cut bunches of them from 5" wide strips of scraps or cut them one at a time from oddly shaped scraps. Let's start with a 5" strip of fabric. After trimming it to 5" wide on your cutting mat, leave it in place for cutting the triangles. Start by cutting from the bottom left corner to the peak of the first triangle at 2" over from the side.

Ok, now cut from that triangle peak to 4" over at bottom of the strip. So, that's 4" over from the bottom left corner of the fabric strip. Yeah for photos, right? This is easier done than described!

Cool, so that's one triangle cut. Now shift your ruler to cut from that bottom point to 4" over at the top. Make that slice to cut another triangle.

Keep on shifting your ruler to cut in a zigzag pattern across the 5" wide strip of fabric. When you run out of room, you're done!
To save time layer several 5" fabric strips and cut through all at once.

Yep, that part is really painless. But, because you love your scraps, you might even want to cut triangles one at a time from unusual shaped scraps by using an already-cut triangle as a template like so:

Step 2: Piece
Soon you'll have a flock of triangles.

Yeah! This quilt goes together in rows, not blocks. Decide how many triangles you'd like to have in each row and start laying things out, or simply sew them together without any planning. I started with rows 15 triangles wide, which are shown in these pictures. When I had determined that I had plenty of triangles for a larger quilt, I enlarged my rows to 23 triangles wide, which is about as wide as my kitchen table (or approximately 34"). You don't have to settle on final width now, because it's easy to add on to your rows.

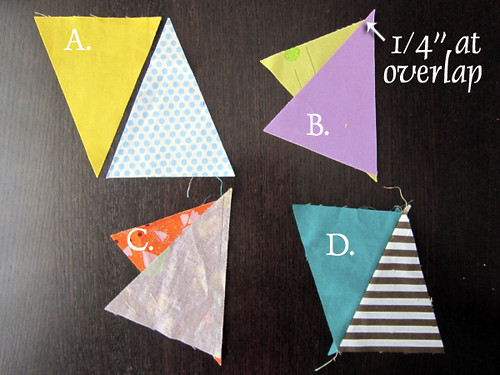
Ok, triangle piecing takes some finesse. Unlike squares, you don't sew them together with all points matching. Let's go step by step. First, I have two triangles laying side by side (A). Then, I flip one triangle over the other along the future seam line (B). Notice those points!!!
You have to slide the triangles until you have those poky bits sticking out.
How much poky, you ask? Just enough so that the fabrics overlap by 1/4" (your seam allowance) where you will start and end sewing. Take a look at example C, where the pair of triangles is sewn. See how the stitch line reaches to the edge of the fabrics right at that 1/4" overlap. This is important! When you press your seam open (D) the triangles are making a straight row because of those vital poky bits. If you match the points instead of making poky bits, your triangles will loose their nice sharp points when the rows are pieced together. It's also a trial and error thing. If you get it wrong, your trusty seam ripper will come to the rescue. Mine was a hero a few times ;)
I suggest you sew all of your triangles into pairs, whipping through a bunch by chain piecing. Press all seams open. Then, return your triangles to a row layout and join to create a long triangle chain. When you join triangle pairs, you still have to make poky bits so that your stitch line extends exactly to that 1/4" overlap, just as illustrated above. The end effect is a row of triangles with a 1/4" seam allowance at the top of each triangle point (see photo in next step).
Step 3: Finishing
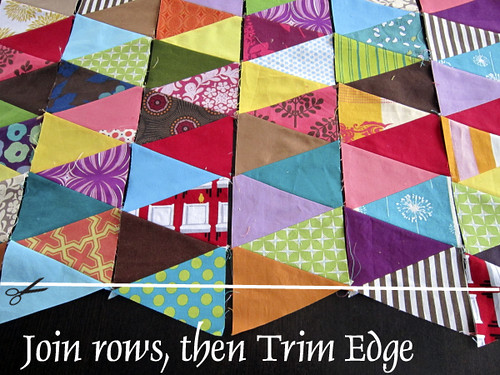
This quilt is so easy! Really, I love the simplicity. Cut, sew rows, finish. After you have as many rows as desired (all made with an equal number of triangles), layout the rows alternating the orientation so that the shapes line up. So, points of triangles touch other triangle points and triangle bases touch other triangle bases.

Now, sew rows together with a 1/4" seam allowance (as always). Hopefully all of your triangles remain pointy thanks to your careful piecing. If a few don't I won't let it get to me. We're having fun, folks!

Last of all, you'll trim the zig-zaggy edges to make a straight edge. I haven't trimmed mine yet because I won't join my rows and finalize things until I'm ready to be finished!
Thanks for sewing along, my friends!

